
Mastering Light and Exposure for your DIY Product Photography
The most important factor in capturing great images of your handmade products is light. It doesn’t matter how fancy a camera or equipment you have, if you don’t have great quality light then you will always be on the back foot! And I always say that the ultimate end goal is a sharp, well-lit image!
Now yes, technically you can sort out many issues in post production, but I always like to get everything looking as good as possible to reduce work after the shoot. So how do you master light and exposure for your DIY Product Photography? Here are my top tips below:
Use the best light source possible
First things first. The best place to start is to use the best light source possible. For DIY product photography the options are:
a. Natural Daylight
b. Continuous Studio Lights
c. Strobe (flash) Studio Lights
So what is the difference?
Natural Daylight
So natural daylight is my absolute favourite kind of light for product photography. It has a lovely quality and looks beautifully natural and it’s FREE! BUT, particularly here in the UK we are very much in the hands of Mother Nature on this one. Some days we don’t get much natural daylight AT ALL! And you cannot control the light so your light source can brighten and darken throughout your shoot meaning you have to work a little harder when editing to get the consistency right in your photos and remove any colour casts the change in lighting has caused. You also sometimes get unwanted shadows on your products particularly on the side furthest away from your light source (your bright window)
Now there are things you can do to maximise the light using natural daylight.
Using a reflector (I use white board or card to the side of the product furthest away from the light source) allows you to maximise the natural daylight from a bright window and bounce it back onto the area of the piece furthest away from the window to brighten unwanted dark shadows. Here is my typical natural daylight setup.

My favourite reflector is this one from Selens (available here on Amazon) as it stands up on its own, and has a silver and black side for adding definition so it is really handy when you only have one pair of hands.
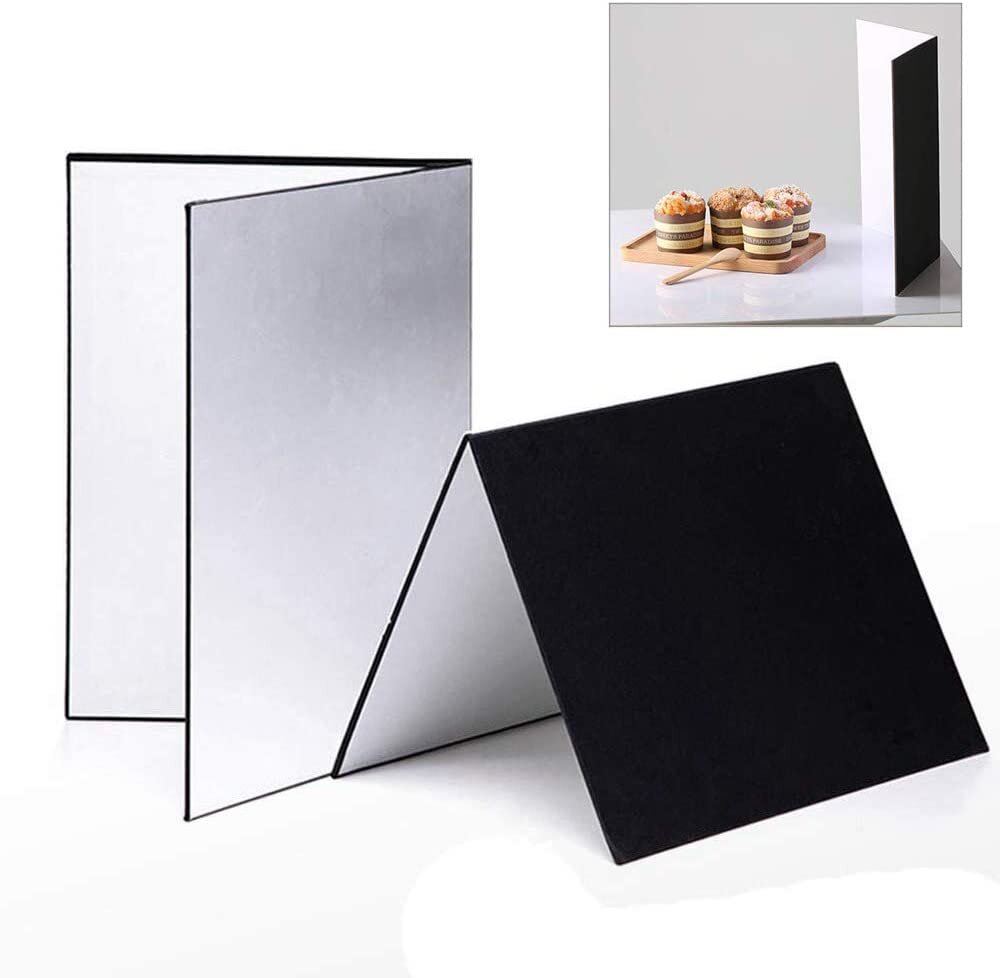
Image Source: www.amazon.co.uk
2. Continuous Studio Lighting
Whilst natural daylight is fantastic and looks beautiful, there are times of the day or times of the year where you will want to add more light. And the best place to start when you venture into lighting is using continuous lighting with daylight bulbs. These are great at closely mimicking natural daylight.
There are lots of different options for continuous lights and you can get little tabletop ones or much larger lights. You can always start by using daylight bulbs in desk lights (make sure they are the ones you can angle the head) before you work up to tabletop or full continuous lights.
Or you can go ahead and purchase either tabletop lights or full lights depending on the side of your products:

Image Source: TableTopStudios

I prefer the larger lights as you have much more flexibility in terms of making them taller or shorter depending on where you most need the light. But obviously the bigger lights need more storage space!
I also recommend the newer LED Daylight bulbs which last longer, don’t get as hot and don’t contain mercury which is toxic if the bulb breaks.
Ideally you want at least three lights (two each side and a boom light which is angled and goes over the top of the product) but if funds are tight start with two. I typically shoot with four - two either ride, one on top and a harder light (undiffused) in front with a gemstone dazzler or diamond dazzler bulb in it for jewellery). Each of my main lights has 5 bulbs in it so I can add or decrease the light as needed.
You will also want to use reflectors as needed with continuous lighting to get the most out of the light.
You can typically get a basic set of continuous lights for £200 upwards.
3. Studio Flash Lights
Now for most scenarios, continuous lighting will provide as much extra light as you need. But as you do more DIY product photography you may find that they aren’t quite powerful enough, particularly for white background.
This is where you might want to look at Studio Flash (also know as Strobes) lights. These provide a lot of light very quickly which drowns out any other light sources. These are often very large and heavy lights and take a bit of time to get used to how to use them properly, so are only really for those serious about photography. But you do get ultimate control and they are fantastic for white background shots.
Studio Flash (strobe) lights typically start at £300 each and you want at least two of them.
Shoot your products on manual mode in-camera
Now you have chosen and maximised your light source, it is time to make sure you are correctly lighting your products in camera.
This is called exposure. Exposure is the amount of light which reaches your camera sensor or film. It is a crucial part of how bright or dark your pictures appear.
The best way to really control the light coming into the camera is to shoot on manual mode (scary I know but bear with me!).
This way you can control all the different factors that influence exposure. These are:
Aperture
Shutter Speed
ISO
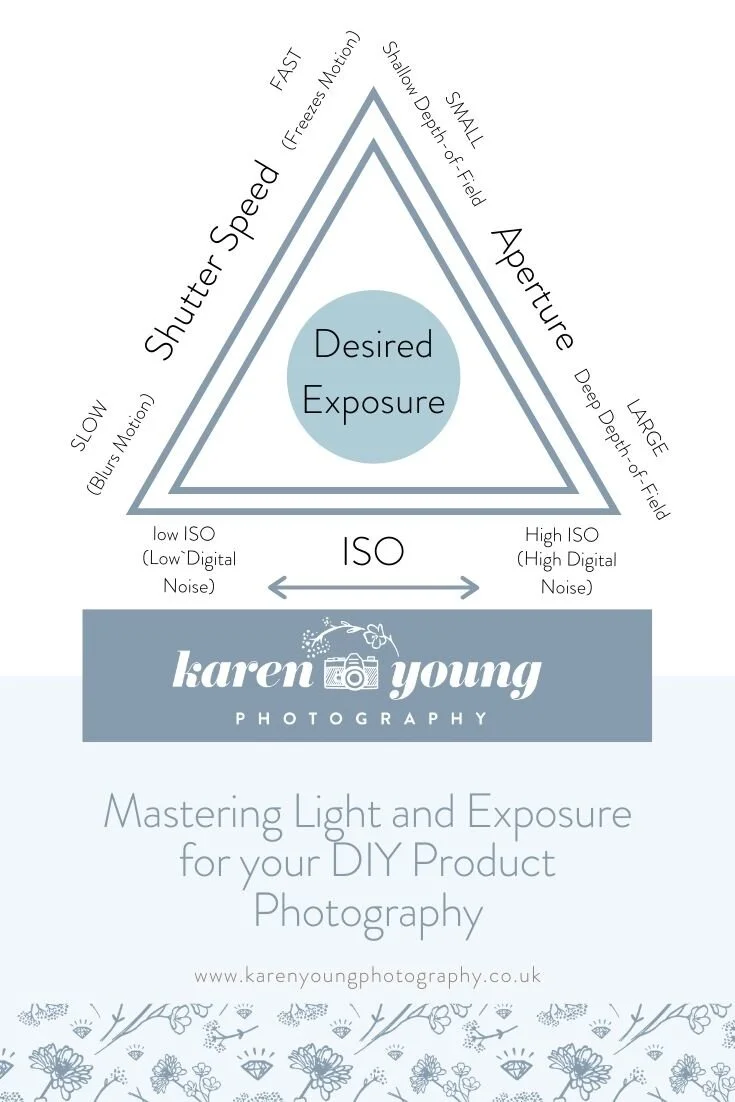
The best way to explain this is via the Exposure Triangle:
THE EXPOSURE TRIANGLE

Essentially, to correctly expose your image, you need to balance all three of these and an adjustment of one of these elements typically requires the adjustment of at least one of the others. Here is a quick summary of each of these.
Aperture
The term Aperture refers to the opening of the lens which allows light into the camera. The human eye works very similarly to the lens of a camera. When it is dark, your pupils enlarge to let more light in, and when its bright and sunny, your pupils get smaller to let less light in.
The camera works the same way. When you don’t have enough light you want to increase the size of the opening (called the f-stop) and decrease the size of the opening or f-stop when you have a lot of light. Unfortunately the scale used to describe aperture is backwards so a large opening has a low f-stop (of say f2.8) and a small opening has a higher number (of say f14). It takes a bit of getting used to but with practice it becomes like driving a car. The aperture also affects depth of field (how much of the image is in focus - I am going to talk more about aperture next time as that is a whole blog in itself!
For now, use a low f-stop if you don’t have enough light and a high f-stop if you have too much!
2. Shutter Speed
The next lever you can control is shutter speed. Shutter speed is the length of time camera shutter is open, exposing light onto the camera sensor. Shutter speed is a bit like your eyelid. The longer between blinks the more light reaches your retina, and the faster you blink the less light goes into your retina.
You can either have a fast or a slower shutter speed depending on how much light you have.
Excellent I hear you say. If I don’t have enough light then I can just have a long shutter speed to let more light in. Well, there are a few problems with shutter speed. The main one is that the longer the shutter is open, the more camera shake can cause blur in your photos (not ideal for product photography!). You typically start to see camera shake in photos with a shutter speed of 1/125 or less.
But there is a great solution to this. If you shoot on a tripod and use a timer or remote control to activate the shutter and take the shot (yes even pressing the shutter button can cause camera shake) then you can virtually eliminate this.
So I would ALWAYS recommend using a tripod for product shots. It means you can have a slower shutter speed to let more light in and you don’t need to worry so much about camera shake.
3. ISO
The final factor in the exposure triangle is ISO. ISO is a camera setting that allows you to increase or decrease your camera’s sensor to light. A low ISO number (say 100) means your sensor is less sensitive to light, whereas a higher ISO (say 3200) means it is more sensitive to light. Ah-ha, I hear you say! If there isn’t enough light then I can just increase the sensitivity of the sensor to capture more light. Well there is a trade off for doing this. The higher the ISO the more digital noise is introduced into your images (they look more grainy). This isn’t ideal for photos. I like to shoot with an ISO of 100 or 200 and add more light to limit the amount of digital noise to achieve clean, high resolution images.
To Conclude!
So those are some great ways to light and correctly expose your DIY product images. I hope you have found this useful! Next time I am going to delve more deeply into Aperture which is the most important part of the exposure triangle for product photography in my opinion!
I created a download of the exposure triangle for you to download and keep close by when having a DIY photoshoot as a handy reminder! I hope you find it useful.
And if you do want some help with your product photography, I am now booking shoots for November 2020 so please do book a complimentary discovery call with me to find out more!